
How to Write a Check
We all hate getting stuck behind someone writing a check at the grocery store. And while this may not be the most efficient use of paper checks, it is important to remember that checks may still be required in some situations (just not the grocery store). Because of this, knowing how to write a check is a skill that every adult should have in their financial toolbelts.
How to Write a Check
Not all checks look the same, but every paper check has the same fields to input information about the amount being paid, who the payee is, and more. Starting from the top of a check and moving to the bottom from left to right, here is how to write a check:
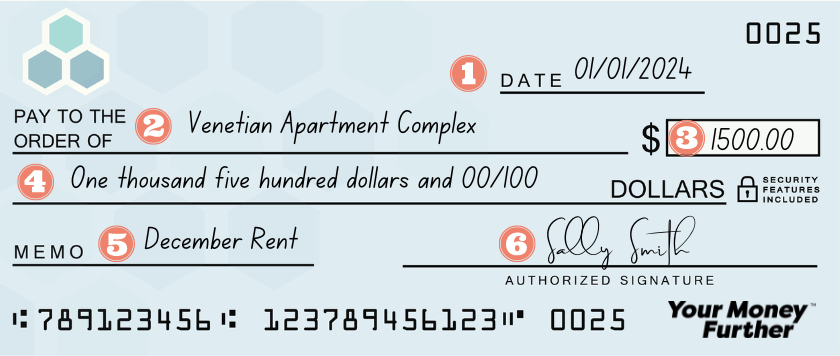
- Write the current date. In the top right corner, enter the date the check is written (typically today’s date). This indicates to both the payee and the bank when it was written. Remember, a paper check is a legal document so the date should always be when you signed the bottom of the check.
- Add the name of the payee. On the line that says “pay to” or “pay to the order of” write the name of the person, company, or organization you want to pay. If you are unsure of the name of the payee, make sure you get the correct information before writing the check.
- Write the payment amount in numerical form. To the right of the printed dollar sign, write the exact amount using dollars and cents. Ensure you write the amount as close to the dollar sign as possible to prevent someone from committing fraud by adding additional digits to the left (for example, changing 500.00 to 5,500.00)
- Write the payment amount in words. On the long line below “pay to the order of”, write out the exact dollar amount in words. For example, if you are paying $1,500.38, you will write “one thousand five hundred dollars and 38/100”. Writing the dollar amount in words is the official amount of your payment. If that amount is different from the numeric form you entered in the previous step, the amount you wrote in words will legally be the amount of your check.
- Include a memo. Although filling out the “memo” or “for” section is optional, it is helpful for indicating why you wrote the check. Some companies or landlords may even require you to provide additional details in the memo line, like your ID number or apartment number.
- Sign the check. As a final step for check writing, make sure you sign on the line at the bottom right of the check. This indicates to the bank that you agree to pay the stated amount to the designated payee. Without a signature, a paper check is not valid.
What are the numbers on a check?
You may have been asked in the past to provide a voided paper check to set up an account or your direct deposit payments. You probably did it without asking many questions. Still, the reason a paper check was requested is that there are important, personal bank numbers listed on paper checks – your account number and bank routing number. These numbers expedite the account setup process. Learn more about the numbers on a paper check:
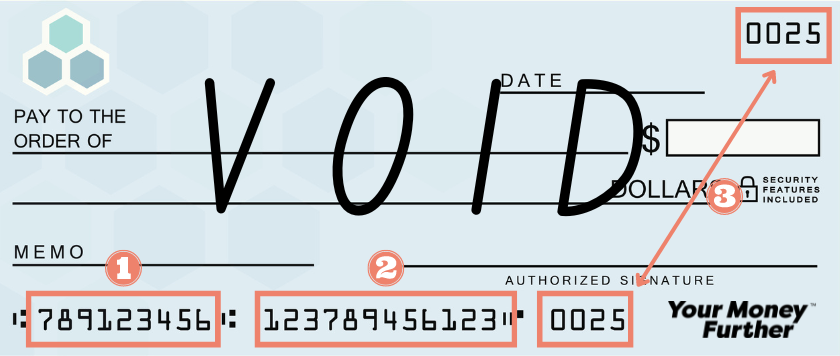
- Bank routing number. Your bank’s routing number is the first set of nine-digit numbers on a check located in the bottom left corner. Every bank has a unique routing number that indicates where the checking account used to fund the paper check was opened. You can think of a routing number as an address associated with your bank, and this “address” is used for electronic transactions like fund transfers, direct deposits, and automatic bill payments.
- Account number. Your account number is the second set of numbers you see on the bottom of your check, and this number will be between 9 and 12 digits. This number lets the bank know which checking account to take the funds from.
- Check number. The final number you see on a paper check is the check number. Each paper check is numbered, and the numbers appear both in the top right corner of the check and after the account number at the bottom of the check. This number is helpful for your own record-keeping.
Along with incredible checking account options, many credit union checking accounts offer the use of paper checks. Interested in opening a checking account at a credit union? Visit our credit union locator to find a credit union near you.


